Fabric Friday

On Wednesday I mentioned that The City Quilter was having a 20% off sale (psst: it’s still on today). And yesterday was also Visit Your Quilt Shop Day, which a lot of people blogged about.

Between the two of those, well, I practically felt an obligation to go see what they had. I’m sure you know what that’s like.

I have to admit, I am trying not to buy anything unless something leaves my stash, because I am simply flat out of space for fabric, but yesterday I made an exception. (For better or worse, I’m good at those.) But I could always count it as part of the replacement for the fabrics I pulled from stash for my scrappy trip quilt, if I really need to rationalize it.

I did go in with restrictions in mind: blenders and grays. I was hoping to pick up some Simply Color sprigs in graphite, but couldn’t find it. Instead I picked up a number of different grays (and one text print) in one-yard cuts:
Full-yard haul 01/24

And I picked up some half-yard cuts of Flea Market Fancy, Madrona Road and the City Quilter’s subway map print in white:
Half-yard haul 01/24

I’m planning to use the madrona road prints for a pincushion, with a solid neutral as the third color. I have no idea what I’ll do with the others, but my stash was low on grays, and I love the Flea Market Fancy flower dot print so much that I’m sure it will get used up quickly.

Scrappy Trip Quilt (& other projects)

Well, I’ve finished 30 blocks for my scrappy trip quilt, and officially run out of floor space in the room in which I sew. Ooops. I’m going for either 7×8 or 8×8 blocks, so I’ve got either 26 or 34 more blocks to go. It’s still fun!

30-blocks

I discovered last weekend that I can strip piece perfectly competently while watching White Collar, if I set my laptop up on my sewing table where I can see it. This is either fantastic or completely terrible for my non-quilting productivity: we’ll see.

I haven’t touched my other WiPs in a while: the semester is getting into gear, and the scrappy trip quilt is the one that’s out, so it’s what is getting worked on.

This means that my New Wave quilt tumblers are still just hanging out on a foamcore board: I’m trying to figure out the arrangement of the stripes, and it’s taking me a while to make up my mind. Any opinions? I’d love to hear what you think about how to re-arrange them: I’m not happy with them right now.

Foamcore-pinned1

As for other projects on my quarterly finish to-do list, I haven’t started cutting for the Pinwheels and Postage Stamps quilt yet, because I feel like I already have enough WiPs out without adding more, and I really don’t have space to lay out the pieces of it without having to move them every time I wanted to work on something.

Finally, for people who live in/near NYC:
The City Quilter is having a 20% off sale on Thursday and Friday! You can bet I’m planning on going over.

Scrappy Trip-Along (WiP Wednesday)

I’ve got a half-dozen works in progress, but only one of them has been getting very much attention recently.

I’ve been making pretty steady progress on my Scrappy Trip-Along quilt, though I fully expect things to slow down for me now that classes are back in session, and my assistantship starts up again. Thankfully, the scrappy trip quilt is very stop-and-start friendly, and each block doesn’t take too long to go together.

So far I have fifteen blocks, and it’s almost big enough that I’ll have to lay it out somewhere else soon.

Scrappy Trip 15 blocks

I made ten blocks straight off, start to finish, and then I made 20 6-strip tubes, which I’m still working my way though. Once I have all twenty sewn up, I’ll pull out iron and make all their seams lie flat — right now they’re still pretty puffy.

I’ve decided to square my blocks up to 12″x12″ — I had hoped not to have to, but there were enough places where the seam allowance would have been really narrow that I didn’t want to risk leaving the blocks untrimmed. They look much neater, now, and I can live with the blocks being not-quite-perfectly-square on the sides of each block.

If you like this pattern, check out the various projects posted in the scrappy trip-along flickr pool!

Organization! It’s a wonderful, if short-lived thing.

I’ve been doing a lot of cleaning and organizing and getting-rid-of-stuff over this winter break. I culled something over seventy books from my overcrowded bookshelves, which means that the books I own now fit on my bookshelves without stacks on the floor for the first time since I moved back to NYC. (Some of them are still double-shelved, but shh, that totally doesn’t count.) I left the bookshelf-bit in this photograph, which is theoretically all about the fabric stash in the top half. You can see all the books! I am irrationally happy about this.

Bookcase+StashJan2013

I also took the opportunity to re-organize my fabric, which is now organized by color, as well as by cut size (more than 3-yard cuts are all in one place), and my sewing cart, which has made getting to things a lot easier, as well as giving me a bigger box for scraps (which is amusing, since right now I’m at probably the lowest level of scraps I’ve been at in months, what with the Scrappy Trip quilt decimating my scraps. Even the contents of the fat quarter box are really organized! The pieces stuck in the left side are long quarters, so I don’t pull something and then get all disappointed when I realize that, no, I can’t cut a 17″x15″ piece from a long quarter-yard.

FatQuarterBoxJan2013

But I also got some fabric in the mail, as belated Christmas presents. I didn’t photograph much of it, but I couldn’t help but get a picture of the Pearl Bracelets fat quarter set that I got from Stash Modern Fabric. Look, isn’t it pretty? All the colors! I love this print so much.

PearlBraceletsFQs

I couldn’t resist pulling some of it right away — cosmonaut, anchor, and river bend are the colors I chose — and I made these three fabric boxes using a tutorial on The Sometimes Crafter.

AllThreeBluePearls2

I used an iron-on interfacing (Pellon 809, which is really stiff) instead of sewing in interfacing, and I think it’s working out pretty well. I pinned them carefully, with vertical pins at each corner, to hold things in place and horizontal pins for three sides, so I wouldn’t have to pull out the pins while I was sewing. I marked the turning hole with vertical pins, because I have been known to sew all the way around something and only then realize that I needed to leave part of it open to turn the project right-side-out.

MidBluePinned

Ironing them square was really fun, though I didn’t take any pictures of that stage. There’s a good tutorial on The Sometimes Crafter.

I’m using them to hold leaders and enders (light in the light box, dark in the dark, sewn pairs in the medium blue box), and I’ve already emptied the medium blue box once, because it was full of paired ones, and I needed more space!

BluePearlsInUse

These are actually my first finish of the year, so I’ve added a picture of them to the 2013 Finish-A-Long Flickr pool.

Finally, because I found it tremendously amusing, have a picture of my cat, Clio, attempting to supervise my sewing while I worked on the Scrappy Trip quilt. (She’s just next to the computer, which plays music or audiobooks while I’m working.)
ClioHelping

2013 Finish-A-Long

This year, I’m going to be participating in the 2013 Finish-A-Long. It looks like a lot of fun, and like a great way to get me to finish some of these projects that have been sitting around forever.

she can quilt

There’s no penalty for listing more things than you can finish, so I’m going to make a pretty ambitious list for myself, and see what happens. (I can predict what happens: I don’t finish all of them.)

Let’s start with the biggest ones and work down:
1) I’m going to finish the Scrappy Trip quilt top. This is a pretty big goal for me, while the semester is going on, especially since it’s going to be a queen-sized quilt, but I’m going to go for it. It makes for really good mindless-sewing, so perhaps I’ll have some luck working on it.
Scrappy trip-a-long

2) I’m going to finish my New Wave quilt. It’s all cut — all I have to do is pick the order of the fabrics, piece it, and quilt it. All. Hah. I’m actually pinning the fabrics up next to each other for this one, and I’ll be posting about that soonish.

3) I’m going to try finish up the 2012 In Color Order Half-Square-Triangle blocks, sash them, and quilt the whole thing. These are one of my July blocks, and two of the March block:
July March2

Finishing this up is a bit of a bigger task than it sounds, because I’m doing 2 blocks for each month, which makes for a twin-sized-or-bigger quilt, not a lap quilt. The main question will be figuring out the sashing, backing and binding fabrics.

4) I want to make a Pinwheels and Postage Stamps quilt using two charm packs and two mini charm packs of Simply Color. I think it will look LOVELY. And I’m not sure how big it will end up being — that’ll depend on how much I can eke out of the fabric I have.

5) I’m going to make a handful of little change purses with keychain rings as gifts for friends using this tutorial on Noodlehead.

6) I’m going to make a trio of fabric baskets to hold my 2 1/2″x2 1/2″ fabric squares and my leaders and enders. The main question for this is picking the fabrics!

7) I’m going to make a weighted pincushion organizer for my sewing table, because it would be nice to have somewhere to put thread scraps without bending over to figure out where I’ve put the garbage can, and I actually don’t have a pincushion right now.

And, honestly, that’s more than enough for me to have on my plate for the spring semester, with all the coursework I have in store!

Scrappy Trip-Along

ScrappyTable

I have enough projects half-done that I really ought not take on another one. But we all know how that works, right? The Scrappy Trip Around the World quilt has been flying around, and I’m afraid I caught the bug big-time.

If you don’t know what I’m talking about, check out photographs on the flickr group, or the tag “scrappytripalong” on Instagram. (In fact, even if you do know what it is, go check out those photos, because, WOW, are there some great blocks and quilts going together! I love how very different this quilt ends up from different people’s stashes.)

The idea for this pattern is basically to use up scraps — you cut strips 2 1/2″ x 16″ and put them together more or less at random. The pattern is really quite ingenious. I’ve really only just finished cutting, so I’ve only made a couple of strip sets so far: I’m going to do at least ten, and then pull out the iron and cut them into proper strips and make up squares.
Two-blocks

Compared to a lot of people out there, I haven’t been quilting for all that long. And I tend to cut fabric as carefully (obsessively?) as I can, so I went through all my scraps pretty fast and didn’t have enough strips cut for the size quilt I wanted.

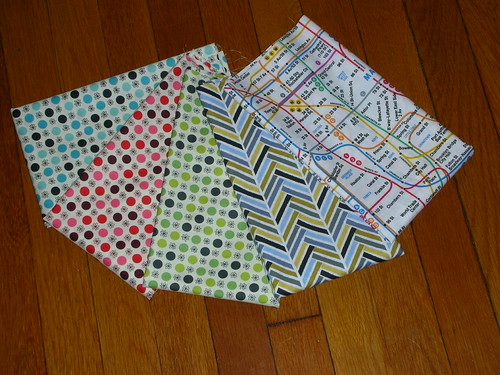
So I went through my “mistake” fabrics — you know the ones, the fabrics that looked great on the shelf or in the picture online, that showed up and made you wonder what you were thinking. Then I went through my fat quarter box and pulled a ton of Jo-Ann fat quarters that I bought on sale a few years ago, to so “something” with. And then, with absolutely perfect timing, two scrap packs I bought before I was even thinking about this quilt arrived in the mail, so I cut those all up and added them to the count!

In the end, I cut kind of a lot of fabric.
ScrappyTable

Why so many? I could tell you that it’s because Brenda, of Pink Castle Fabrics did the math to tell how many strips to cut for various sizes of quilts, and you need 336 strips for a queen-sized quilt. I could tell you that! I’m certainly planning on a queen-sized quilt.

But, um. I kind of just got caught up in the joy of hacking up scraps. I also tossed in every once in a while something that I really do like, so that I’ll be able to look at the quilt and find squares that I love hiding in all the scrappiness.

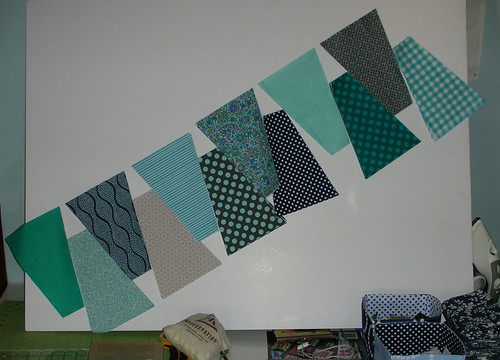
Now, this quilt thrives on randomness, and I’m really bad at random. So I cheated. I divided up my fabrics into color groups.
Strip-Piles
In case you’re wondering, I cut 74 Pink/Red/Orange, 74 Yellow/Green, 75 Blue/Purple, 38 Dark Browns, 40 Blacks, 71 Light Neutrals, and 20 OMGWTF ALL THE COLORS strips.

With this pre-color-selected setup, it’s really easy: all I have to do is make sure that each block contains one black or brown, and something from each other pile. Or two from one pile, if I’m feeling in a blue and purple mood. It makes putting together the blocks really easy for me, which it would not be at all if I had to pull from a giant pile on the floor.

I’m trying one new thing for this project: I’m using leaders and enders. I’ve got more than enough 2 1/2″ squares, between my own scraps and some mini-charm-packs I picked up from FatQuarterShop.

I’m using a shortcut for those, too: I’ve divided them into “light” and “dark” and made three piles of each. When I need to pick up another two squares, I match up whatever’s on top of those piles with whatever else is on top and looks best. So far, I’m getting quite a few of them, and it’s really satisfying. Not to mention, not having to hold down the thread ends every time I start a new strip? SO NICE.

LeaderEnderPiles

I’ve still got a few Christmas presents that haven’t made it up here yet, and a finished quilt to show off on Friday, if I can get decent pictures between now and then.

Gifted and unblogged…

Though my semester was really pretty crazy, I did manage to finish a couple of other projects either in snatches of borrowed time or in mid-December, once my papers were all in.

The one I’m going to talk about here today was another Mabel Messenger Bag, which I put together using Perk Me Up fabrics — I saw them over the summer and instantly knew they were made for a friend of mine who loves all things chocolate and coffee. This collection? Pretty much perfect for her. She asked for a bag she could use for her knitting, and liked the Mabel bag I made over the summer:
GreenBirdDoor1

This bag is altered in a couple of ways. One side of the bag is a simple piece of Kona Chocolate, with a large print on it as an exterior pocket. The magnetic snap attaches inside the pocket, which seemed like a good idea at the time, but … well, I probably wouldn’t do it again.
PerkMeUpFront

The other side is a patchwork of the various different fabrics in the Perk Me Up collection.
PerkMeUpBack

One problem I had with my first Mabel bag is that the strap slides a lot. For this bag I made two changes to help it stay in place. I made it scrappy, with seams that add a little bit of body to the strap every few inches, and I made it just a smidge wider than the pattern called for.

The inside has a simple unzipped pocket, just the right size for knitting needles, scissors, crochet hooks, etc. It’s going to be used as a knitting bag, so I made sure it went to its new home with some yarn and a set of DPNs. (The green blob is a lace shawl, which will show up here as soon as I block it. Don’t hold your breath: I’m terrible about blocking things.)
PerkMeUpInside

I really enjoyed making this pattern for a second time: it makes for a very smart bag, and I think I managed a couple of the details like the snap and the bag’s strap a little better this time than I did last time. It was a lot of fun to revisit the pattern.