Fabric Stash

Having already shown you all my yarn stash some time ago, I figured it was time to do the same for my fabric stash. I always love seeing the way other people organize their fabric, and how they store it: hopefully some of you feel the same way.

This is all of it at once:
All_Fabric

It’s a disaster area right now. To the left there are two cubes that are only about half fabric: one has my neutrals-and-or-miscellaneous pile and a bunch of black fabric; the one below it has interfacing and bags of scraps.

The floor is usually … well, no, it’s not usually any neater than that. I’m trying to figure out what to do with the leftover blocks from the Mixtape quilt (probably pillows?) and I have the fabric for two skirts that I haven’t started just yet.

And, well. That’s almost all of my fabric. There are also the blue and brown fat quarters I pulled for the Dresden quilt, and the coffee-themed fat quarters that will become a shoulder bag, and the bits I’ve cut for the Kitchen Window quilt. *ahem* I think I just need a little more time, and I’d be able to tame it a bit.

I fold all of it the same way, following this method, on In Color Order for uniformity’s sake. For cuts a half-yard or larger, I make one less fold, leaving me with a long rectangle of fabric (that fills up the back of my deep shelves) instead of a shorter, fatter square. Fat quarters are shorter squares, and I shelve them two-deep.

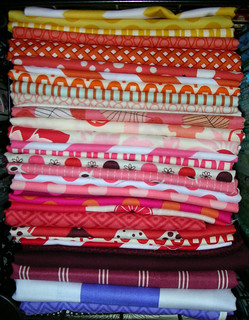
I’ve got it largely organized by color. There are the purples to yellows (mostly warm colors, though some of the purple might not count):
RedYellowStack

There are the greens to blues (can we tell these are some of my favorite colors? Yeah, just a bit.) This stack lacks the navy blues, because there’s just not space:
BlueGreenStack

There are the neutrals, though this stack also houses the navy blues and any fabrics I have that don’t have a single dominant color:
BrownBlackStack

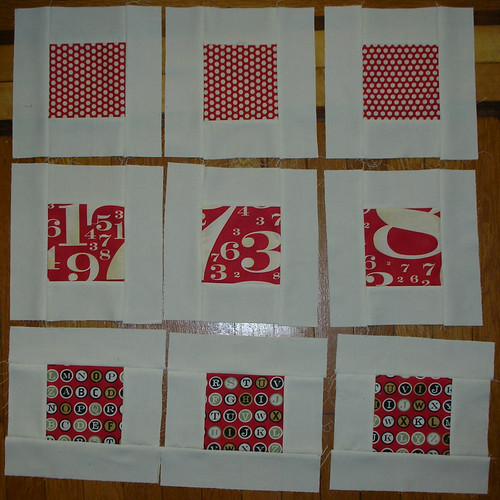
I break one other “rule” in my neutrals stack: you see that fat quarter block of Summerville? Well, I shelve my fat quarters separately, because of the way I fold things. Those Summerville blocks should be in one of these stacks!

This one is my back row of fat quarters: solids and single-color prints and stripes — since taking this picture, I’ve integrated the stripes into my color-sorted piles and used the Circa 1934 on the bottom right of this photograph.
FatQuartersStripedSolid

This is the front row of fat quarters. Some of them aren’t fat quarters after all, but quarter yards cut long: I don’t worry about it too much:
FatQuarters

Finally, there’s the miscellaneous stacks on the bottom. They hold larger cuts of fabric, fat quarter collections, or complete lines.

This one is all 1001 Peeps, which is absurd. (I found it just as I started quilting, and decided it was fabulous. And then I found a sale. And, well, this is what happened. I just have to get myself to actually USE it!)
1001PeepsStack

This one is a hodge-podge:
FatQuarterCollectionStack

The very top is Curious Nature, by Parson Brown. The next one down is Circa 1934 in blacks. The next after that is a rainbow bundle from FabricWorm, which sits on an enormous cut of white Kona cotton. Below that are two fat quarter bundles from Pink Castle Fabrics.

The first bundle, Smooth Sailing, looks like this:
Smooth Sailing bundle

The second one, Sea Glass, looks like this:
Sea Glass bundle

Beneath those are some striped blue and brown fabric that I’m going to use as the backing of my Dresden quilt, whenever I make it, about a yard and a half (or two yards?) of a key print, and several yards of a punctuation print in navy. You can also see the red and white striped fabric I just used as a backing for my Filmstrip Quilt

I have projects in mind for much of this — certainly for most of the fat quarter bundles. But I do pick things up from time to time not because I know exactly what it’s going to be, but because they’re pretty.

How do you organize your stash?

Finished Filmstrip Quilt!

Filmstrip Quilt: based on the tutorial written up by Crazy Mom Quilts
The prints are Cosmo Cricket’s Circa 1934, the cream fabric is Kona Cotton, the black fabric is something I had in my stash, of unknown maker.

I managed to get photographs of this quilt on Wednesday morning before work, so that I could set up a post about it for today. The quilt has been finished, and all the little ends sewn in and so on, but hasn’t been washed yet: I want to get some color-catchers before I do that, because I’m not certain I trust the black not to stain, and that would be a pity.

It was already hot outside at 8am: I was really glad I didn’t need to huddle under the quilt for any photographs.
FQ-Far

FQ-Close

The backing is a single piece of red and white striped fabric that I’ve had since about 2007 or 2008 — I picked it up at a yard sale on a whim, sure I’d make something out of it. Well, I did! Finally. You can see the scrappy binding pretty clearly in all of these photographs.

FQ-Back

I quilted it in straight lines about 1/4″ from the seams between the blocks and the sashing, using white thread, which more or less disappears into the cream/red fabrics, and provides a little bit of pop for the black. The lines are very, very wobbly: this is not a quilt that would win any awards for precision. At least some of it is because not all of my blocks lined up perfectly, so there was the occasional wonky intersection. Part of it, though, is probably sheer impatience: I find straight-line binding really boring, and about 2/3 of the way through I really just wanted it to be DONE.

FQ-Detail2

Still, overall, I’m pretty happy with how it came out!

FQ-Close

Quick post!

I’m running off to California for a wedding this weekend, and my computer will be staying at home to avoid flying hassles at security, so I’ll be a little scarce, but I’ll be back on Monday!

I just finished my Filmstrip quilt Tuesday evening. It took me about three and a half hours to hand-sew the binding onto a quilt that only had about 200″ of binding: this is why I usually machine-bind my quilts. Perhaps I’ll get better and faster if I do more by hand. And I watched some episodes of Chevalier D’Eon while I worked on it: the dub is really quite awkward, and the premise kind of absurd (that’s not how alchemy works, guys!) but I still want to know what happens next.

I’ve tried to photograph the Filmstrip quilt and I hope to be able to post about it on Friday as part of Thank God It’s Finished Friday, which Plum and June is hosting this week. But that may not happen, depending on how busy things are once I get out to California. I’ll be staying with my college roommate, and I’m not certain how much free time we’ll end up having.

In the meantime, I’m auditioning colors for the “frames” of my Kitchen Window quilt. I’m torn between navy blue and black. Here are two photographs:

The photo taken with flash:
SashingChoices-flash

The photo taken without flash:
SashingChoices-noflash

Opinions would be greatly appreciated. I like the warmth and interaction of the blue, but I find it draws my eyes away from the prints. The black is a lot starker, but I find that that makes me look more closely at the prints, ignoring the black as if it were a framed photograph.

What do you think?

Linking up to WiP Wednesday, because, hey, this Kitchen Window quilt is totally a work in progress, and there are always some really excellent projects and posts linked up — go check some of them out!

WIP Wednesday at Freshly Pieced

A thoroughly relaxing weekend.

Last weekend was great: I went to see Avengers on Friday with a friend who hadn’t seen it yet, went to the Brooklyn Flea with the same friend on Saturday, and spent the rest of the weekend hiding in air conditioning and quilting. My family was out of town, so I had the house more or less to myself.

I’m almost done with the Circa 1934 Filmstrip quilt: all I have to do is sew down the binding. This may take me a while, though, because I’ve decided I want to do it by hand, and I’m terribly slow at sewing by hand.
QuiltPile

I made it a scrappy binding, alternating black fabric with strips of the various prints used in the front of the quilt: I had just enough to make it work, with hardly anything left over at the end.
Scrappy-binding

The backing is a simple red and white stripe — I’ve actually had the fabric for years, trying to figure out what to do with it. I suppose this will only encourage me to be a packrat in the future. (Ooops.)

I also cut fabric for my next project — a Kitchen Window quilt. Because I don’t have enough half-done projects already, right? But I know myself well enough by now to know that I’ll pretty much always have more than one WiP at a time: I do it with knitting, with spinning, even with reading books: I like to have a variety to flip back and forth between.

Cut-fabrics

I’m torn right now between using a black fabric for the frame and using a navy one — I’ll have to lay them both out for a little bit and look at them in different light, I think. The sashing between windows will be a deep green to pick up some of the teals and greens in the panes.

How were your weekends? Anything out of the ordinary, or interesting projects?

If you have time, check out the Monday Link-Up at Plum and June:

And keep an eye out for the Let’s Get Aquainted blog hop posts this week: there are three on Tuesday this week!

Circa 1934 meets Filmstrip.

Happy Friday the 13th!

This quilt is (hopefully) going to be a quick project. I’m following the tutorial for a Filmstrip Quilt at Crazy Mom Quilts.

This is what it looks like right now:
Filmstrip-Layout
I’m not happy with the way the print repeats in the upper right hand corner, but I’m not sure how to fix it. Suggestions would be awesome.

I cut out the pieces on Tuesday night and Wednesday night, and ironed the ones that were being stubborn about curling where they’d been folded. (I know I should iron before cutting, but I was just so impatient… it hasn’t caused any problems yet.)

I’m using five fat quarters of the Circa 1934 and 1 yard of a Kona cream-colored cotton (I don’t recall which exactly), which were enough to make 15 block centers and 15 block borders, with a teeny bit of each print left over, which I may add to a scrappy binding, spaced out with black. I may also just bind it in a red-white-stripe. I cut my solid stupidly, and had to piece together my last two 9″x2.5″ strips together from scraps, which was a little annoying. I’ll know better next time.

This is it all cut:
Filmstrip-cut

I pinned all of the blocks to their short borders first, which took a while, but meant that I was able to chain piece the 15 red-centered blocks in one fell swoop, which was nice and fast:

Filmstrip-pieced

I finished all the white-bordered blocks first, before embarking on the red-bordered ones.

Another two bouts of pinning and ironing and trimming later, I have all of my 30 blocks, trimmed to 8.5″.

These pictures show half of them, before I trimmed them:
Filmstrip_Pressed_2cb

Filmstrip_pressed_3cb

I made up a schematic the other day and decided that I really want there to be sashing between the blocks: so I’ll be adding 1.5″ strips of black between the various blocks, and arranging the blocks diagonally, rather than horizontally. This is my very awkward mock-up:

RedBlack-Circa-1934

I haven’t the faintest idea what I’m going to do with this quilt once it’s done, but I can figure that out later.

Blocks of the Month, halfway done.

Hooray for holiday long-weekends: I was able to catch up on the Half-Square Triangle Block of the Month Quilt Along last week. I finished second blocks for January through May and made one block each for June and July — then I ran out of squares of white fabric and had to stop. Poor packing — next time I’ll know better.

These are my January blocks:
January2

These are the February blocks:
February2

These are the March blocks:
March2

These are the April blocks:
April2

This is my second May block: (the first one is still not fixed)
May

This is my first June block:
June

This is my first July block:
July

A number of the points on the blocks aren’t matched as precisely as they might be — it’s visible in the June block, for example. It’s true of a number of the second blocks, which has a lot to do with having sewn them on the Singer 66, with a little less attention to spare for making sure everything lines up, since I’m concentrating on treadling, too.

I’m not a hundred percent happy with the make-up/final appearance of all of the blocks, but I’ve been regarding this quilt-along as a learning process in selecting fabrics. There are some blocks I’m particularly happy with: the all-solid January block and the July block are favorites of mine right now. I’ll have to see how it all comes out in the end. :)

It seems appropriate to link up to WIP Wednesday today, given that this project is almost exactly halfway done: I’ve got twelve of my final twenty-four HST blocks.

WIP Wednesday at Freshly Pieced

Other works-in-progress that I’m working on (or planning, but haven’t cut just yet) are a knitting bag for a friend, using the Perk Me Up fat quarter bundle, which just about yelled her name at me when I saw it. I’ll be using this pattern, with the modification of adding both an inner, zipped divider pocket as in the orange example in the linked post, and a set of flat pockets for knitting needles and other tools, along one of the inner walls of the bag.

I made two Dresden wheels of the coffee fabric — at first I thought I’d applique one onto the bag, but that idea died a swift death. Now I’m thinking about putting together a mini quilt for the EZ Dresden Challenge, with three wheels on the front, one larger and two smaller. I would have pictures, but it was dark by the time I finished the second one on Tuesday evening.

I was going to try to make a large (queen sized) Dresden quilt for the EZ Dresden Challenge, but I decided that trying to make, quilt, bind and finish a queen-sized Dresden quilt by August 31st when I have class, volunteer work, a MA thesis to finish, and plans to go to Europe for eleven days in August (though it’s not set in stone — I don’t have tickets yet…) — well, I figured trying to shove in a complicated queen-sized quilt on top of that was a little bit crazytown.

Still, these are 16 of the 20 colors I’ll use, when I do start that quilt, which I will in September:
Blue Brown Dresden trial wheel

In the meantime, last night I cut up some red Cosmo Cricket Circa 1934 and some off-white Kona cotton to put together a Film Strip / Little Plates quilt — inspired by Books Bound’s recent baby quilt, which is based on Crazymomquilts’s Film Strip quilt. I also looked a little bit at the pattern in Elizabeth Hartman’s Practical Guide to Patchwork, which pairs prints with prints in some blocks. I’ve been looking for a pattern that has comparatively large pieces of fabric, to show off the typewriter keys and the larger numbers of the Circa 1934 prints, and this looks like it’ll be fun. It also looks like it’ll be a fast project, which is something I’m really looking for — for some reason I’ve been itching for a finish for the last few days.

Sewing on a Singer 66.

I mentioned last week that I’ve been sewing on a Singer 66 foot-treadle sewing machine, so I thought I’d post a little bit about the machine.

My family has it because about thirty years ago one of my father’s co-workers bought a furnished house, and was going to throw this sewing machine away. My dad bought it from them for $10, and since then, it’s lived in my parents’ house in Connecticut. (That house had no electricity when I was a child, thus the mechanical sewing machine rather than an electric one.)

I learned to sew on this machine when I was around ten or twelve, and played with the foot treadle and base of the table before then: it made a great fort if you draped sheets around it and you were very, very small.

These days, it usually looks like a little table right next to the dining room table:
S66-Closed

When you remove the candles and runner, you can see that at some point in its history, it wasn’t treated all that well. One of my projects for this summer is to lightly sand off the existing finish and oil the wood, to help it be a little better protected from the sun. I did the same thing to my spinning wheel a couple of years ago: it takes focus, and willingness to do rather tedious, repetitive work, but the end result is completely worth it: the wood just gleams. But that’s in the future. For now, it looks like this:
S66-Closed-bare

Then you flip open the tabletop, which folds up to the left, and you see that this little table holds something rather more interesting than a drawer! Other than, of course, the four drawers it has on its sides, which are fabulous for holding thread and pins and needles and scissors and all the other notions you want to put somewhere close at hand. This machine is really well designed.
S66-Open-flat

You flip up the piece of wood closest to you, (which is unfortunately a little hard to tell in this picture):
S66-Open-One-Up

Then you look in: it’s a sewing machine! Lying on its side!
S66-Open-Look-In

You pull the machine up, and lift it just high enough that the front piece of wood goes beneath it: the machine rests on it, and stays up and solid. This is a really well-engineered machine, and it all fits together very well.
S66-Open-Up

From a little more of a distance, it looks like this:
S66-Open-Up-Full

Then you make sure the belt goes around the drive wheel, under the table, and check it’s seated properly around the machine’s wheel, and you’re almost ready to go. You can see the drive band in this picture: it’s the red thing that loops around the cast-iron wheel. When you treadle, the large wheel (let’s call it the drive wheel) goes around: the belt connects it to a smaller wheel on the machine, and a series of little gears and belts powers the machine, making the needle go up and down as you treadle.
S66-Treadle

Now you’re almost ready to sew! You thread the machine (and this is one of the places where looking at the manual I found online was helpful, as I was running the thread just a smidge wrong before:
S66-Open-Up-Threaded

The biggest difference for me in sewing on this machine, once I’d gotten it oiled properly and the tension adjusted (you turn the large knob on the head of the machine to adjust the top thread tension, and the bobbin thread just sort of does its own thing), is that you have to remember that your feet need to keep moving. Once it’s in the swing of things, this is easy enough: it’s trying to sew while the machine is still waking up (so to speak) that’s a chore. Sometimes I’d have to re-start the wheel by hand on each full rock of the treadle, because it stalled out, which was very annoying.

But I did learn to sew on this machine, so it came back to me — kind of like riding a bicycle, I suppose. It’s the same muscle-memory coming back to help you, after all. I still found that my seams are less precise (I don’t have a quarter-inch foot for this machine, for one thing, thus the masking tape) and that the fabric tends to drag more — I’m going to try buffing the bottom of the foot, to see if getting rid of some of the corrosion will help the fabric move more smoothly. Overall, though, it’s a fun project, and I’m really enjoying myself — I feel very lucky to get the chance to use this, and to also be able to go home and use an electric machine with a simple one-foot-pedal, which always seems so easy in comparison when I first get home!

If there’s anything in particular you’d like to know about the machine, just ask — if I know the answer, I’ll answer to the best of my ability!

I’m not sure when this machine was made: there are a lot of websites about the history of sewing machines, and they mostly seem to suggest that the Singer 66 model was made for a long period of time. I don’t know how to localize it more specifically than that.

Let’s end with a quick reminder about the Lets Get Acquainted Blog Hop on Plum and June. Today is the Monday link up!

Head on over to find out who will be posting this week, and check out their blogs on Tuesday and Thursday — you’ll find some really excellent tutorials and quilters this way.

Half-Square Triangle Block of the Month

Happy belated 4th of July! I hope everyone who celebrated it had a good time. We watched fireworks over the horizon and met up with. neighbors and friends.

But back on topic! Remember this?

Man, do I feel behind! Jeni just posted the July Block, and I haven’t even made up a single June block yet!

Last weekend I was able to trim all of my half-square triangle blocks for my second blocks for January-May, and two sets for June,, but not to sew them together, because I couldn’t figure out how to change the stitch length on the sewing machine. Why? Well, it’s a Singer 66. I don’t have a picture of it just yet, but this will give you an idea.

This is actually the machine I learned to sew on, but when I was learning (oh, twelve or fifteen years ago, now) my grandmother was taking care of my sister and me and she knew how to make the machine dance. In contrast, my approach to it is “Think really hard: maybe I can logic it out!” and my mother’s is “Turn everything that turns, oops, that’s not supposed to come off!” For some reason, these were not the ideal approaches.

So I’ve done a little online research on the Singer 66. That let me figure out how to adjust the tension and stitch length I oiled all of the various joints and hinges. It works more smoothly now, and I’ve been able to see up my second blocks for January through May. Hopefully I’ll be able to finish my June blocks and one of the July blocks: I didn’t bring enough white fabric with me to make two sets of July blocks. I’ll still be closer to caught up than I was before. :)