WiP Wednesday, January 2013

New Wave quilt:
I’m using the Sunday Best bundle from Pink Castle Fabrics, but I replaced the two white prints with blue and grey, because I didn’t want white tumblers framed by white sashing.
photo (3)
(I promise, those ones that look white are actually light blue or light grey: I can’t find my real camera, and an iPod can only do so much…)
To-Do:
-Piece tumblers and sashing into strips
-Piece together strips into quilt top
-Figure out a backing (dark blue?) using extra tumblers
-baste, quilt & bind

Strip and Flip Quilt
I altered this one a little bit — I cut the strips 2 1/2″ wide instead of 2″ and I was very careful sewing the strips together, to keep as much length as possible, so it’s a bit larger than the pattern suggests. The cat is thoroughly unimpressed by it, but I’m looking forward to finding my camera and taking proper pictures of it.
photo (4)
To-Do:
-buy binding fabric, bind the quilt, figure out who on earth it’s for.

Simple Math:
This one hasn’t gone much of anywhere since I last posted, because its blocks are sitting on the back of my sewing cart, and apparently out of sight is out of mind. Oops.
To-Do:
-finish trimming blocks to 6″ square
-find sashing fabric
-baste, quilt & bind

Kitchen Window:
This one has only seen a little bit of progress since the last time I posted, too, but I’ve got parts of it halfway done — enough that the next time I have black thread on the machine I can start piecing blocks together to see what they look like. I think part of the reason I keep putting this one off is because it’s for a queen-sized quilt, and the idea of that large a project is a bit daunting. Still, just a step at a time, and I’ll get there eventually.
To-Do:
-sort out the second half of the cut fabrics into groups for individual blocks
-cut the rest of the black fabric for frames
-cut the rest of the green fabric for background parts
-start constructing blocks
-fiddle with layout
-make back
-baste, quilt & bind

WiP Wednesday as the semester first kicks in

The fall semester has been kicking up into gear, so I’ve had less time to work on projects recently. It’s also influenced what I’ve been working on to a certain extent. That said, I’ve still gotten some things done!

Finished:
I made three notebook covers for classes, following Rachel’s tutorial on Stitched in Color. I’m going to make one more in yellow and red, to match the Plantagenet colors, for my class on the Angevin Empire. And this time, I’ll (hopefully!) remember to add a pocket before I sew it all together!
Notebooks

HST BoM QAL: some progress! I made the second July block & and my first of two August blocks.
July-August HST BoM
-finish second August block (cut and partially pieced)
-fix botched May block already!
-start thinking about how to arrange the blocks & what to back the quilt with.

Knitting lots of progress!
-monkey socks in Persia (Malabrigo sock):
Malabrigo Monkey Socks
The more time I spend on the subway going to and from work/class, the more knitting I get done — I may have to take up hand-stitching things, if the majority of my crafting time continues to be on the subway.

Perk Me Up Bag: some progress.
I finished one side of the bag, which is a patchwork of the various fabrics, and I quilted it, because it’s a lot sturdier that way: I didn’t want to risk knitting needles poking their way through the bag and stabbing someone.
-iron interfacing to back of bag exterior and/or quilt it, too.
-attach pocket to back of bag exterior
-cut strap extender, strap and closure strap, attaching appropriate hardware
-sew lining together with internal zippered pocket in place
-attach lining to exterior pieces
-finish strap and etc.

Simple Math: trimmed a few more blocks!
-finish trimming blocks to 6″ square
-find sashing fabric
-baste, quilt & bind

Baby K’s Quilt: no progress since last week. This one is what’s laid out on my WiP cart right now, but I keep putting things on top of it — I should just get it done! There’s a bit left to work on.
Block2
-sew together two more postage stamp panels
-construct pinwheels
-lay out & attach borders
-construct backing
-baste, quilt & bind

Kitchen Window: no progress since last week.
-sort out cut fabrics into groups for individual blocks
-cut black fabric for frames
-cut green fabric for background parts
-start constructing blocks
-fiddle with layout
-make back
-baste, quilt & bind

Spinning: no progress since last week.
-Merino/yak continues to entice me, but I’m not watching much TV, so not much spinning is getting done. Perhaps I’ll watch a move with friends/family one night this week, to give myself some time off before things get crazy. That might be fun.

WIP Wednesday

Linking up to WIP Wednesday at Freshly Pieced, and to the Small Blog meet-up at Lily’s Quilts. If you’re stopping by for the first time, you might be interested in learning more about me, or in looking at my finished quilts. If you’re interested in any particular kind of project, check out the tags in the lower right sidebar.

This is a remarkably picture-poor post, largely because it’s a to-do-list of the various projects I have in progress right now. Never let it be said that I’m a monogamous crafter? Projects are arranged in (sort of) order of least-work-to-be-finished.

General To-Do List:
-Tape a large piece of batting up on the tops of my two really tall bookcases and pin things to it, in an attempt to create something that sort of resembles a design wall
-Clean crafting stuff off my desk so it’s actually usable for schoolwork.
-Likewise clear books out of crafting space so I can actually sew w/out moving piles of stuff.

Test-Drive Mabel Bag To-Do List:
-Be proud of inside pockets and the fact that the lining actually (mostly) fits inside the exterior of the bag.
GreenBirdInt2
GreenBirdExt
-Attach strap and strap extender once bag hardware arrives in the mail
-Sew around the opening, matching lining to bag outsides
-Turn it inside out to end up rightside out & sew up lining bottom
-Iron (and maybe topstitch?) for a finished, professional look

Mini Dresden To-Do List:
-Back of mini Dresden quilt: alternating tumblers in a variety of fabrics across a brown background: figure out the right size of tumbler
-Finish the corner fans of the mini-Dresden quilt, and arrange so that they will look all right after binding
-Binding of mini Dresden quilt: probably in a darker brown, but possibly in a scrappy series of colors. I’m torn between wanting to make it more cheerful and wanting the focus really to snap to the middle medallions
-Quilt & appliqué!

Simple Math To-Do List:
-Finish trimming all blocks from 6-and-almost-a-half-ish-inches to 6″ square
SimpleMathHalfTrimmed
-Re-jigger design to figure out yardage needed to make a double-bed quilt out of slightly smaller blocks
-Pick out sashing & binding fabric (next week, with L, hopefully!)
-Cut sashing
-Piece a scrappy border, alternating white and blue
-Piece entire top (ugh!)
-Figure out backing for the quilt (!?!?!)
-Sandwich, quilt, bind
-Give to mom on October 18

Kitchen Window To-Do List:
KitchenWindowMockUp
-Cut the black 1 1/2″ strips for the “frames”
-Order more Kelly green and cut green strips for “borders”
-Cut about a dozen more organizing cards, number all 36 of them from 1-36
-Start laying out all 36 blocks, figuring out which ones need to be oriented vertically and which horizontally
-Piece blocks
-Arrange blocks on (hopefully!) “design wall”
-Piece top & figure out backing and binding
-Baste, quilt, bind

Knitting To-Do List:
-Subway socks (Malabrigo Monkeys)
-Red NaNo Sweater started in *cough* 2010: finish arms, finish torso. Yes, it’s fiddly cables: suck it up and knit it already.
-Modern Baby Blanket: finish while watching Olympics. Hope I have enough yarn.
-Finish the legs of those red socks already. Give them to mom on October 18.

Spinning To-Do List:
-Get cracking on that yarn for mom’s sweater. Finish it up by December, for a Christmas present.
-Spin exclusively from stash: maybe some merino/yak? Or the lovely greens from MA Sheep&Wool.

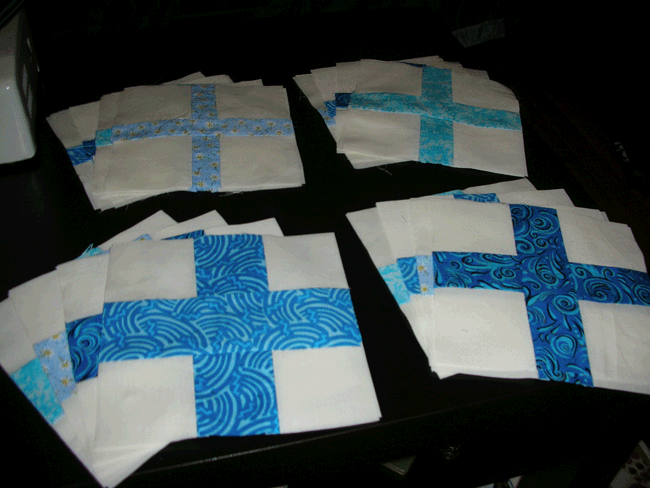
Simple Math blocks completed!

Those four stacks are all one hundred twenty (120!!) blocks for my adapted-to-double-size Simple Math quilt. There are four widths of crosses: 1″, 1 1/4″, 1 1/2″ and 2″. There are fifteen fabrics total, and two patches in each width in each fabric.

I made up blocks in five patterns each of light, medium and dark fabrics.

Here are the light-colored fabrics I used:

The center block in the back row is Kona cotton, because I wanted to add a solid to each group. The one in the back right is from the fat quarter bin at my local fabric store. The other three came from Jo-Ann fabrics sometime in the last four years.

Next up are the medium fabrics:

The center top is a Kona cotton solid again, and the bottom left is from the local fat quarter bin. The other three? Same as above.

And the dark fabrics, which might be my favorite:

Top right is the Kona cotton solid, which looks black here, but is actually the same deep blue as the Nine-Patch Lattice Quilt I made last month. Bottom right is Illuminate, from Lizzy House’s 1001 Peeps collection. I love the whole collection, so when one of the generic calicos I had for this didn’t work out, I was pleased to be able to pull this one in.


But now that they’re all done, they’re actually going to have to sit for a little while, until I can find a time when both my mother and myself can get to a fabric store together to pick a sashing fabric (and a backing fabric!). Once that’s all done, I can start putting them all together and worrying about how to quilt it properly. (I have some ideas, but they have to wait until I’m sure I know what I’m doing…)

In the mean time, I still have to quilt my Nine-Patch Lattice quilt, and I’ve started another quilt for a friend’s son, which will show up next time.

Sizing up Simple Math

The Simple Math pattern (by Elizabeth Hartman of Oh, Fransson!) as written makes a finished quilt of about 47″ x 62″, made of 48 blocks. Now, I’m all for reasonable-sized projects (well, sometimes), but I wanted to make it in a size I’d actually use on a bed: I’ve got enough lap blankets knit up to last me quite some time, and I’m not much for hanging quilts on the wall. (Well. Not yet, at least.)

I figured out that if I wanted to make a quilt roughly twin sized, I’d need to make 80 blocks. Well, I thought — I’m well on my way! Look, I have 64 of them done!


All right, so it doesn’t look very impressive in those little bitty stacks. But that’s still 64 6.5″ square crosses right there!

And I only have two more colors to go, to get this all cut and sewn, see?

And then my mother (for whom I’m making this quilt) said: “Well, we don’t really need a twin size quilt. What about a full size one for the guest room?”

So I agreed, sighed, looked at the pattern, and drew myself a new mock-up. This one takes 120 blocks:

Here’s my logic in putting this diagram together.

I’m putting 2″ strips between the blocks, so that works out to 1.5″ of sashing on each side of a block (assume 1/4″ seams). The blocks are squared to 6.5″, so they will be 6″ square, if I put them together properly. This means I can increase this pattern by increments of 7.5″ (6″ block + 1.5″ sashing) So I did that, and increased it in size to 10 x 12 rows of blocks.

You’ll notice one other difference from the pattern as written: I decided to add a striped border using the scraps from the fat quarter fabrics. It will be 3″ wide, striping blues and the white background fabric. The white stripes will always be 3″ square, but the blues will vary in width from 1 1/2″ to 2 1/2″, in the same increments as the crosses. I’m looking forward to piecing that part together, though I suspect I’m going to hate it just a little bit when I’m putting it together.

That striped border adds 3″ to each side of the quilt, for a total of 6″. But then I wanted to be sure I had plenty of material around the edge of the quilt to trim and still have enough room to sew on the binding without it obscuring the stripes. So I added in a 3″ strip of sashing around the outside of my impromptu striped border, which adds another 6″ to the final dimensions.

And when you do the math for all of that, the finished quilt ends up being a whopping 88.5″ x 103.5″

I’m a little daunted by the idea of quilting all of that, but I’m pretty sure I know how I’m going to do it, so that part, at least, is a little less scary.

Of course, increasing from 80 to 120 blocks doesn’t just happen by itself. So I walked over to the fabric store, and picked up three solids and two prints, to make another 40 blocks:

The solids are Kona cotton, the prints are whatever happened to be in the fat quarter bin and caught my eye.

I’ve cut three of them so far, but then the draft deadline for the paper that will become my thesis called, and I’ve paused right now, about to cut out the stripes from the last two fat quarters, and then cut 40 more 6″x6″ white blocks for the backgrounds of all those new crosses. I’m just glad I have a few extra yards of this white background fabric: otherwise I would be very, very sad.

I guess it’s not called frogging when you quilt, huh?

Just a short post today, because I have a 25-page paper due tomorrow.

So you know how you get into a rhythm of something, and it starts to feel almost automatic? I was in that state earlier when I was working on a set of blocks for my Simple Math quilt. Then I looked down at what I was working on.

What’s wrong with this picture?

Let me help:

Do you see it now?

I wasn’t paying close enough attention, and sewed both color strips in place of just one of them. So I got to make friends with my seam ripper. I think we’re both the better for it. I’ve ripped out a couple of other blocks since then, to make them line up square in the center. It may not look that bad, but I would much rather re-do it now than look at the quilt months from now and see only the mistakes I didn’t fix.

And of course, my mother (for whom I’m making this quilt) decided a few days ago that, really, they don’t have any twin beds that need quilts. But there is the double bed in the guestroom…

So I got to do all the math to size up the Simple Math quilt not just to twin size, but again up to full, and to find the fabric I needed to make the extra blocks I hadn’t counted on at first. My scanner is being stubborn this morning, so I’ll scan in my drawings later this week.

Simple Math

Of course, now that I’ve gotten to the point where I could, theoretically, bind and quilt the Nine-Patch quilt, my safety pins haven’t arrived in the mail. And I’ve seen tutorials for using a spray-on-adhesive, but I haven’t really got anywhere outdoors to spray it (or any adhesive). I suppose I could always baste the layers together by hand, but I really hate basting by hand.

That delay clearly just means it’s time to start cutting for another quilt, right?

Cut fabric for Simple Math

And maybe piecing a couple of blocks together.

Pieced squares for Simple Math

And then pressing and trimming some of the pieced blocks.

Smallest two sets of pieced and pressed blocks for Simple Math
Fattest cross blocks for Simple Math

And, well, I’ve now made 60% of the blocks I’ll need for a slightly altered (to Twin size) Simple Math quilt.

Thirty two blocks for Simple Math in four colors

I love the way the crosses vary from narrower to fatter, but it’s been making some of the blocks a little bit challenging.

The larger two, with crosses that are 2″ and 1 1/2″ inches wide, are no problem. The smaller two, with crosses that are 1 1/4″ and 1″ wide, pieced into a block 6″ square — well, in that case, you need your seams to be kind of exact — and not all of mine are. There exists the chance that I’ll have to rip a couple of them out and re-do them later, to make them come out quite right — or give them sliiiiightly wider sashing to make a row go together properly. I’ll see when I have more of the blocks done: I did a much better job with the fifth and sixth pairs of narrow crosses than I had with the first four of them.